This is the eighth in a series of posts I am writing about the game of hypergammon. The previous posts are [Hyper 01], [Hyper 02], [Hyper 03], [Hyper 04], [Hyper 05], [Hyper 06], and [Hyper 07].
Wastage
As you recall, wastage is the difference between (1) the number of pips your checkers must move to get off and (2) the number of pips you expect to roll to get your checkers off. Last time, I asked what positions in hypergammon have the highest and lowest wastage.
When there are many checkers in play, it is easier to get a feel for what positions have high and low wastage. It is not so easy when there are just a few checkers.
Wastage with One Checker
A checker on the ace point is the highest wastage you can have with one checker. Your pip count is very low (just 1) compared to the number of pips you expect to roll (8.167).
 | Highest wastage: 8.1667 − 1 = 7.1667 |
A checker on p2 or p3 has less wastage than this because the pip count is higher but the rolls-to-get-off is the same. Even a checker on p4 is likely to be off in one roll, so the thin possibility of needing 2 rolls is more than offset by the extra pip of distance.
The farther you move the checker out, the lower the wastage gets until you reach p7. That is the position that has the lowest wastage in hypergammon. (It is also the position that has the lowest wastage in backgammon.)
 | Lowest wastage: 11.1409 − 7 = 4.1409 |
| Position | Wastage |
| 1 | 7.1667 |
| 2 | 6.1667 |
| 3 | 5.1667 |
| 4 | 4.6204 |
| 5 | 4.3009 |
| 6 | 4.2083 |
| 7 | 4.1409 |
Wastage with Two Checkers
It is hard to get a feel for wastage in two-checker positions. There are two competing forces: On the one hand, you’d like to have your checkers farther out where the pip count is greater and you have more flexibility in how to play your checkers. On the other hand you’d like to maximize your chances of getting off in a single roll because a second roll adds another 8.167 pips to the EPC.
I would never have guessed the highest wastage position for two checkers — you take the highest and lowest wastage positions for one checker and combine them.
 | Highest wastage: 15.5267 − 8 = 7.5267 |
| Position | Wastage |
| 7,1 | 7.5267 |
| 3,3 | 6.4769 |
| 2,2 | 6.4352 |
| 1,1 | 6.1667 |
Likewise, I would never have guessed how to minimize wastage with two checkers. Take the highest wastage 2-checker position and slide the checker on p7 down to p3.
 | Lowest wastage: 8.6204 − 4 = 4.6204 |
| Position | Wastage |
| 3,1 | 4.6204 |
| 4,1 | 4.7546 |
| 6,5 | 5.0071 |
| 5,2 | 5.0484 |
| 6,4 | 5.1060 |
| 5,1 | 5.1157 |
| 4,2 | 5.1157 |
Wastage with Three Checkers
If your first instinct for creating a lot of wastage with 3 checkers is to put all 3 checkers on your ace point, then your instinct is correct. This is the highest wastage postion in hypergammon.
 | Highest wastage: 14.9722 − 3 = 11.9722 |
And if your instinct says that to create low wastage you should put your checkers on points 6, 5, and 4, then you’d be very close too. The lowest wastage position with three checkers is [12,6,5], but [6,5,4] is not far behind.
 | Lowest wastage: 28.2950 − 23 = 5.2950 |
| Position | Wastage |
| 12,6,5 | 5.2950 |
| 6,5,4 | 5.3058 |
| 6,4,3 | 5.4005 |
| 6,5,3 | 5.4015 |
| 6,5,5 | 5.4468 |
| 6,6,5 | 5.4694 |
What Is Contact?
Up to this point I have been discussing wastage in pure races. Now let’s look at contact positions. But before we do, I’d like to ask: What exactly is “contact”?
All backgammon players have a good idea what contact is. A contact position is a position where the sides are engaged with each other — where there is still a chance of some hitting or blocking. The opposite of contact is a pure race where there is no longer any interaction between the two sides.
But that is not a precise definition. To refine this definition, let’s look at some positions and try to identify which positions have contact and which do not. This isn’t just an academic question — the term “contact” appears in the rules of tournament backgammon. You can resign a game only in a noncontact position.
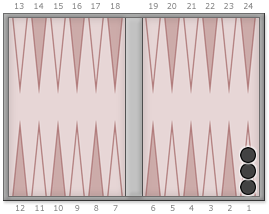
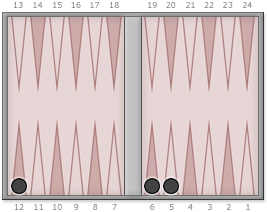
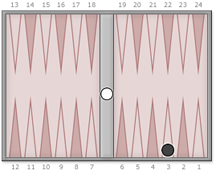
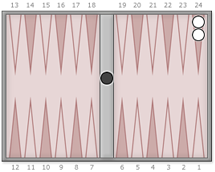
So which of the following positions have contact? (This is really more of a poll rather than a question with a definitive answer. What I’m asking is, what is your definition of contact.)
In each case it is black’s turn to roll.
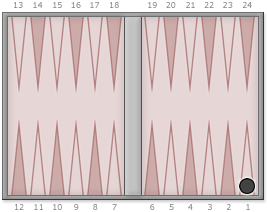
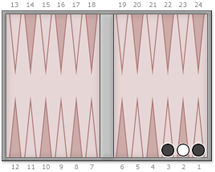
 a. 12 v 12 | 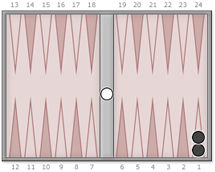 b. 1,1 v bar |
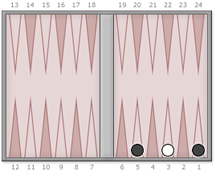
 c. 3 v bar | 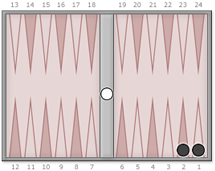 d. 2,1 v bar |
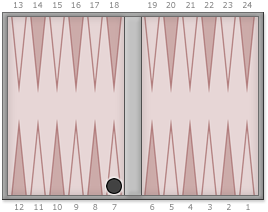
 e. 3,1 v 23 | 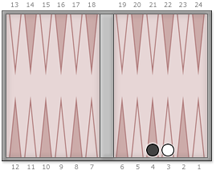 f. 4 v 22 |
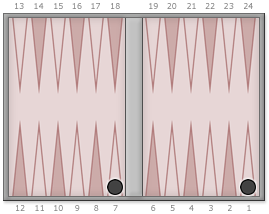
 g. 5,1 v 22 | 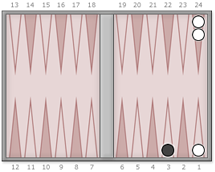 h. 3 v 24,1,1 |
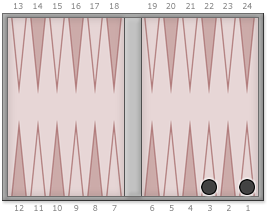
 i. bar v 1,1 | 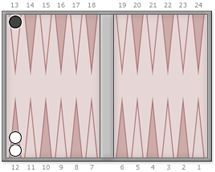 j. 13 v 13,13 |